Amy and I will be playing as RAVINE/MACHINE again on the 4th December at The Rose Hill in Brighton. We have support from R.Dyer and I AM FYA. I think it’s going to be a great night, and a great way to start the festive season. Come along, there will be mince pies! Tickets available here.
Author: admin
More RAVINE/MACHINE
Well, the gig at Spirt of Gravity on Thursday was a lot of fun. It was our first performance as RAVINE/MACHINE and despite the trip hazards, allergy poisonings and misbehaving laptops, the end result was great. I definitely want to play more gigs in this format. I’ve wanted to work with a visual artist for a long time and Amy is the perfect match. Her beautiful photography, which forms the basis of her projections are wonderfully augmented by her intricate and unusual manual projections. It’s really inspiring to accompany them with my sound. We are organising more gigs now (Brighton and London), so watch this space. If you want us to play please get in touch.
RAVINE/MACHINE
I have my first performance on Thursday playing as RAVINE/MACHINE, a collaboration with experimental film-maker, Dr Amy Cutler. Expect analogue projections powered by candles and carousels, accompanied by haunting textures from my DIY drone box. We’ve been discussing this project online for over a year, but due to current circumstances only got to collaborate in person in recent days. Be lovely to see some of you there.

A Consequence Of Distance
New Cutlasses album A Consequence of Distance releases today! Last December, I put up an open request for artists on Twitter to collaborate on a project inspired by the parlour game Consequences. I created an initial set of sounds using acoustic instruments processed through a palette of DIY effects that I have made. I then sent these to the artists, who worked with them and sent them back, iterating like this until we had finished a piece of music. Today you can finally hear the results!
Available on Bandcamp https://cutlasses.bandcamp.com/album/a-consequence-of-distance as a digital download, or on the physical format making its big comeback, CD! Housed in a lovely hand-assembled laser cut case. All profits donated to charities to help arts venues struggling post Covid and fighting Climate Change. If you buy today, Bandcamp are donating their share to NAACP Legal Defense Fund, a racial justice organization, so even if this isn’t your cup of tea, why not buy some other music today, so you can help the artists much more effectively than streaming, and contribute to achieving racial justice!
Spirit of Gravity
Spirit of Gravity is Brighton’s longest running (and best) night for experimental music. I was honoured to return, this time with a streamed performance. I can’t wait until I’m able to attend SoG again as a punter when Covid restrictions relax.
Sands
I’ve been working on an STM32 granular processor on and off for about a year now. It’s called Sands, and if you follow my instagram you’ve probably seen some of its development.
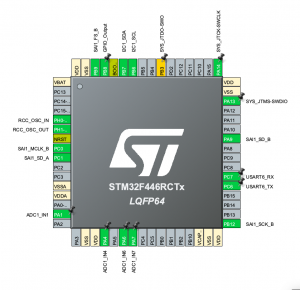
View this post on InstagramI’ve managed to get the hardware working (based around an STM32f446 with a WM8731 audio codec), but I’ve hit a bit of a brick wall with it sonically. Everything is working as expected, but I’m not as excited by the sound as I am with my Glitch Delay, which I use on pretty much everything!
I had an idea to port the firmware to VCV Rack, so I could easily try it with lots of different modules (with one or 2 exceptions, I only really own modules I’ve built myself). Here is a very simple example (ironically I do own Rings and a Turing Machine).
If anyone interested in granular wants to try Sands on VCV Rack (Mac only currently), then email me. I’m keen to get feedback, and suggestions, or even see it working in a patch you’ve made.
New EP
My new EP, “The Days That Remain And Those That Follow” is available now! This EP was recorded in the first half of 2020 and reflects at a macroscopic scale, on the insanely tumultuous events of the year, but on a more personal level it echoes the anxiety and joy of impending parenthood.
The somewhat immovable deadline of my son’s birth provided a power motivator to finish the tracks, even though he arrived slightly before the tracks were totally completed. The pieces were created using my DIY instruments and effects, starting off as live improvisations, and slowly polished into finished pieces.
I plan to do some track breakdowns, to dig into how these were put together. Check back in the following days.
Cutlasses and R.Dyer live in the Lockdown Lounge
Thanks to all of that ‘attended’ our performance last night. Combining a fairly involved audio setup with a 2 camera visual setup was quite tricky, and I was a little nervous about it all, but it all seemed to go down ok.
Gear:
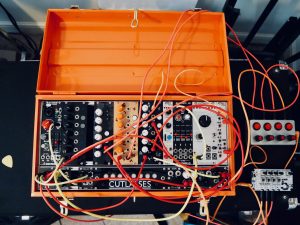
Everything in this case is DIY (including the case itself). It all starts with the Befaco Instrument Interface, that’s the pre-amp for my guitar, and all the other instruments. After that, everything is going through an effects loop of guitar pedals (DOD volume pedal, Devi Ever Shoe Gazer, EHX Memory Man with Hazarai, Digitech Hardwire Reverb) via a Syinsi pedal i/o 1U tile. I was originally using my Khronos module for the delay->reverb, but actually the Teensy DAC was just too noisy, and seems to be noiser now than ever, possibly because I’m running a lot of modules from a cheap power supply board. I will make something similar using a module with an external audio codec at some point. After that the sound is routed to the modules I’ve designed, Glitch Delay, Audio Freeze, and 2 Looper modules. These form the core of my sound. I have the Foxfield Gearbox as the master clock. The Music Thing Turing Machine with Pulses is sending triggers to the looper to randomly cut up the loop. My alternate RadioDrum firmware for the RadioMusic, is providing all the drum sounds. The Befaco ADSR is responsible for that pulsing distortions at the end of the set. Everything is then routed to my 2 mixers, a passive one that I designed, and the Rakit 5 mixer. Ideally I’d like to get a eurorack mixer with some EQ, I’ve got my eye on the Befaco Hex Mix, but it looks like quite an involved build, so need to find the time. See here for more details on the modules I’ve designed and the piezo noise boxes.
Live stream
R.Dyer and myself were supposed to do a live show last month at the Rose Hill, but it was cancelled for obvious reasons. Why not watch us from the comfort of your own sofa instead, perhaps with a warming glass of Brandy? Playing Saturday 23rd May 8:30 UK time.
Developing on STM32
Over the past months I’ve been investigating moving away from Teensy to another microcontroller ecosystem. I love Teensy, and I wouldn’t have made the majority of my projects without it, I’ve learnt so much from it, and I still think it has the best libraries of any of the alternatives. It’s always the first thing I recommend to get people started on doing digital audio electronics and I’m sure I’ll use it again in the future. But, it has a few, in my opinion, major downsides, once you get a bit more advanced.
Development Environment – Teensy uses the Arduino IDE, which is fine for writing small programs to flash leds, read sensors etc, but is a little basic for larger scale projects.
Debugging – This is the big one for me, Teensy doesn’t provide a method for debugging (other than using Serial Monitor). I’ve spent literally hours trying to debug audio glitches that would have been relatively straightforward to find if I could just set a breakpoint and step-through. I have seen people exposing the JTAG pins on the Teensy and using these, but I wanted something supported by the vendor.
Manufacture – If you want to do a manufacturing run of your project with Teensy you have 2 options. Either mount the Teensy itself on the board, which can become quite expensive if you’re doing more than a couple, or buy the bootloaders directly from PJRC and use the specific microcontroller to match the Teensy. I wanted to be able to make small runs of my boards (still less than 10), without the expense of buying many Teensy’s, and choose a chip specific to the needs of each project.
STM32
After chatting with Alex Evans, (mmalex on Twitter), who had already started working with the STM32 range of microcontrollers, I decided to check them out. They have a huge range of chips, ranging from arduino level all the way up to Teensy 4 capabilities. The Eclipse based IDE supports debugging, and they are fairly easy to include in your schematic (requiring a bunch of power-filtering caps but not much else.)
STM make their own range of dev boards, similar to Arduino and Teensy, called Nucleo. There are lots of them, and it takes a while to filter through the STM range and find the chip and associated Nucleo you are looking for. They’re very reasonably priced (I suspect they are sold as a loss-leader) and are the best way to get started. They have a fairly large form-factor, so it’s unlikely you’d want to include them directly in your project, like you would a Teensy. But they are perfect for experimenting with the hardware before you start on your own PCB.
I strongly recommend checking out mmalex’s youtube channel, where he has live streamed a series of videos explaining how to get into STM32 eurorack module design. They are super informative and well worth watching. Also this series by DigiKey on getting started with STM32 is essential viewing if you are interested in developing with them.
STM32CubeIDE
First experiences with the IDE weren’t great, unfortunately it’s plagued with a number of small bugs and glitches. It really didn’t like me working in C++ and kept defaulting my project to C, which I then had to unpick in the project settings each time. Actually that bug has been fixed, and it does seem to be slowly improving, although each new update seems to introduce some fun new issues. It works ok-ish though, it’s free to use, and I can FINALLY debug!
The work-flow involves using the IDE to visually configure your chip, you can set which peripherals you want to use, and which pins to connect them to. This will then generate (lots) of code, which basically sets the correct registers to initialise the peripherals and provides you functions to use them. They use something they call HAL (Hardware Abstraction Layer), so that the functions look the same regardless of what underlying chip you are using. Beware though, I’ve heard that different chips seem to have their own foibles in terms of setup, and some of the code requires manual tweaking. I’m using an F446, and so far, the generated code seems to be fine.
Once this code is generated, you can start adding your own code. Any code added in the auto-generated files needs to exist between specific comment lines that the generator marks out for you. My first project was a PCB which connected the STM32F446 to a WM8731 audio codec, was powered by eurorack +12/-12V, and broke out many of the STM32 pins onto header. The intention is that this board will be coupled with another (module specific) board, which will add interface components (pots, jacks etc) and route them to the breakout pins. You can see the code here which initialises the STM32 and configures the WM8731 via I2C.
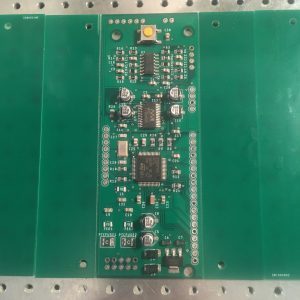
The SMT32 board with solder paste applied and components placed ready for the reflow oven. I’ve just sent out some gerbers (PCB files) for manufacture, I will hopefully have them in a week or so, so look out for more news on my latest module!

